Misc. : Adding Extra Network Interfaces to pfSense in VirtualBox
In this module, we’ll walk through adding a fifth (or more) network interface to pfSense using VBoxManage on Windows, allowing segmentation of additional lab environments.
Configuring an Extra Network Interface on pfSense in VirtualBox
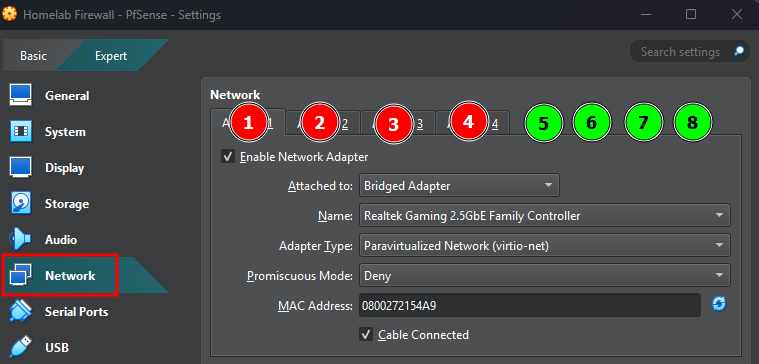
In the VirtualBox interface, only 4 tabs are available to configure network adapters for a VM. However, it's possible to add up to 8 network interfaces per VM through additional configuration.
Using the VirtualBox CLI (On Windows)
To add additional interfaces to our pfSense VM, we’ll use the VirtualBox command-line tool, vboxmanage.exe.
In this example, I'm using PowerShell. On my system, VirtualBox is installed in C:\Program Files\Oracle\VirtualBox. Let’s navigate to that directory and run vboxmanage.exe to explore its functionalities. Running the command displays general usage instructions, and further down, you'll find a comprehensive list of available commands and their options.
cd 'C:\Program Files\Oracle\VirtualBox\'
.\VBoxManage.exe

Information We Need to Add the Interface
- VM Name (case sensitive)
- Interface ID (interface number, 1 through 8)
- Attachment Type
Internal Network - Internal Network Name (if
Internal Networkis used asAttachment Type) - Promiscuous Mode
- Cable Connected (is set to
Onby default)
What is "Promiscuous mode" in netwoking ?
Promiscuous mode is a special setting for a network interface card (NIC) that allows it to intercept and read all network traffic on a network segment, regardless of its destination MAC address.
Normally, A NIC will only receive packets that are:
- Broadcast/multicast
- Unicast to its own MAC address
In Promiscuous Mode:
The NIC will forward every packet it sees to the operating system, even if it's not addressed to it.
Use Cases:
- Network sniffing/packet capturing tools like Wireshark or tcpdump
- Intrusion Detection Systems (IDS) like Suricata (used later in this series)
- Network forensics and troubleshooting
- Security assessments or pentesting
Following the official documentation for vboxmanage.exe, here are options you find in the GUI for configuring virtual network interfaces via the command line.
the X stands for the number of the interface, 1 through 8.
1. Attachment Type (--nicX)
Use this to define the networking mode of the adapter,
--nicX none               # Not attached
--nicX null               # Alias for 'none'
--nicX nat                # Basic NAT access to the internet
--nicX bridged            # Bridges to a physical host NIC
--nicX intnet             # Internal network (isolated, VM-to-VM only)
--nicX hostonly           # Connects to host via host-only adapter
--nicX generic            # For custom network drivers
--nicX natnetwork         # Connects to a named NAT network (multi-VM NAT)
--nicX cloud              # Cloud Network (EXPERIMENTAL)
2. Adapter Type (--nictypeX)
Sets the virtual hardware for the NIC. Default depends on OS, but virtio is fastest:
--nictypeX Am79C970A              # PCnet-PCI II
--nictypeX Am79C973               # PCnet-FAST III
--nictypeX 82540EM                # Intel PRO/1000 MT Desktop
--nictypeX 82543GC                # Intel PRO/1000 T Server
--nictypeX 82545EM                # Intel PRO/1000 MT Server
--nictypeX virtio                 # Paravirtualized Network (virtio-net)
3. Promiscuous Mode (--nicpromiscX)
Controls whether the NIC can capture traffic not addressed to it:
--nicpromiscX deny               # Default — VM only sees its own traffic
--nicpromiscX allow-vms          # VM can see traffic from other VMs only
--nicpromiscX allow-all          # VM can see all traffic (like a hub)
4. MAC Address (--macaddressX)
Assigns a static MAC address to the NIC (optional). Format: 12 hex digits (no colons):
--macaddressX 080027AABBCC # Example MAC
If not specified, VirtualBox auto-generates one.
5. Cable Connected (--cableconnectedX)
Controls whether the virtual cable is plugged in:
--cableconnectedX on             # Connect the virtual cable (default value)
--cableconnectedX off            # Disconnect the cable (NIC appears unplugged)
Finally, you can check the current configuration of your VM using PowerShell by running the following command:
.\VBoxManage.exe showvminfo "VM_NAME" # in the screenshot our lab firewall "Homelab Firewall - PfSense"
Example : Adding a new network interface for a new subnet NEW_SUBNET:
details For the interface are as follows:
- VM Name:
Homelab Firewall - PfSense(case sensitive) - New Interface ID:
5(new interface number) - Attachment Type
Internal Network - Internal Network Name:
Homelab - NEW_SUBNET - Promiscuous Mode:
deny - Cable Connected
Yes(is set to On by default)
# Configure NIC5 for Internal Network with promiscuous mode and virtio
.\VBoxManage.exe modifyvm "Homelab Firewall - PfSense" --nic5 intnet
.\VBoxManage.exe modifyvm "Homelab Firewall - PfSense" --intnet5 "Homelab - NEW_SUBNET"
.\VBoxManage.exe modifyvm "Homelab Firewall - PfSense" --nictype5 virtio
.\VBoxManage.exe modifyvm "Homelab Firewall - PfSense" --nicpromisc5 deny
# If you want a specific MAC adress, otherwise it will be generated automatically
.\VBoxManage.exe modifyvm "Homelab Firewall - PfSense" --macaddress5 080027DEADBEEF
# Optional, gets set to "on" by default
.\VBoxManage.exe modifyvm "Homelab Firewall - PfSense" --cableconnected5 on
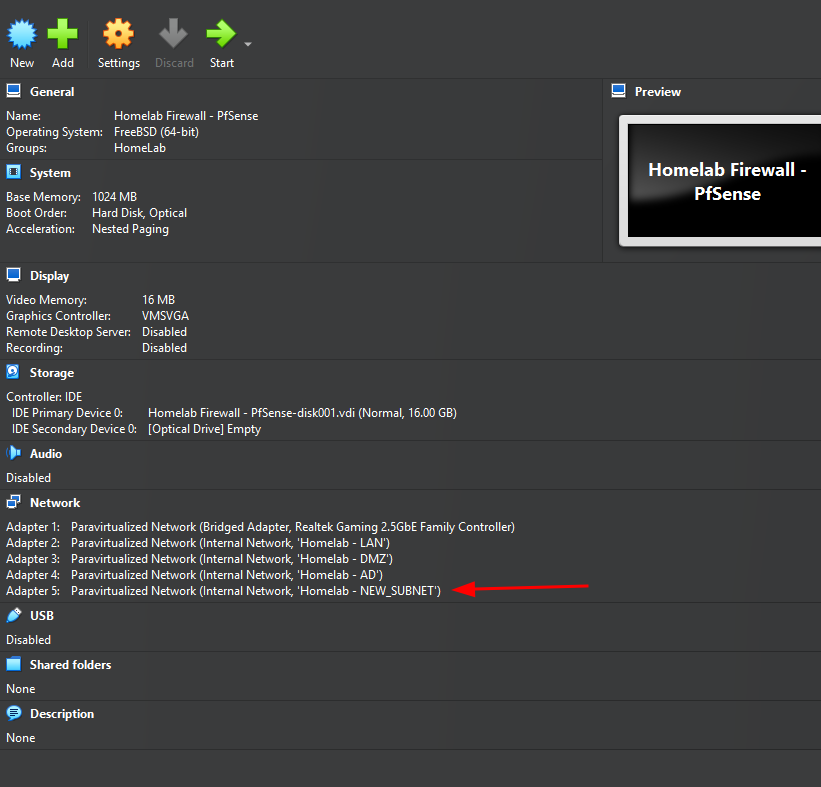
Notice the new adapter Adapter 5 that shows up in virtualbox
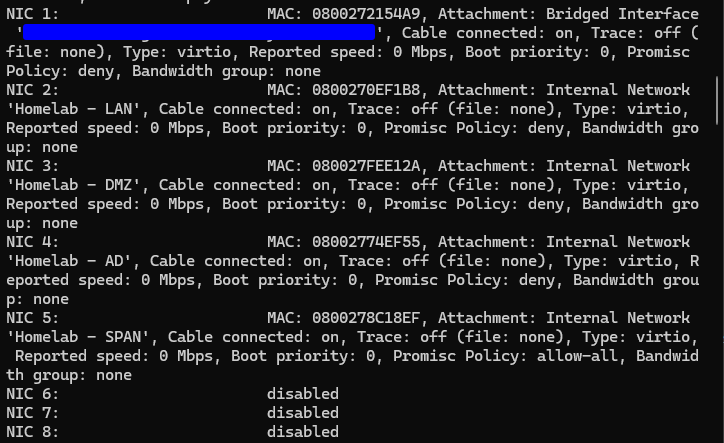
Start the pfSense VM. You’ll notice that only four interfaces are listed—this is expected, as the newly added interface hasn’t been brought up yet.
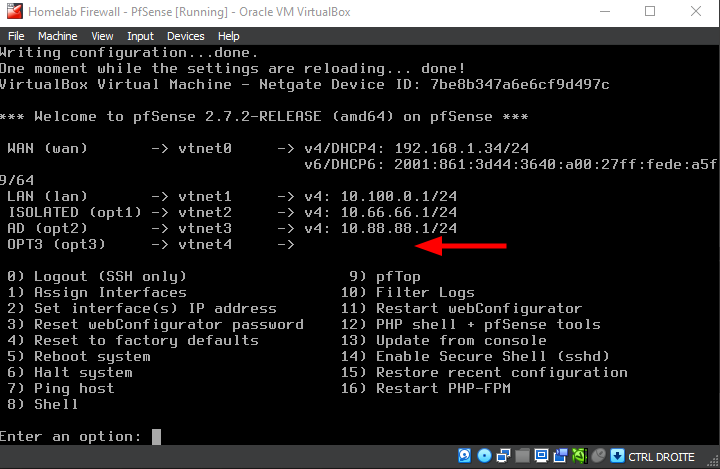
Notice the new adapter OPT3 that shows up in PfSense
We’ll now repeat some of the steps covered earlier in the "Deploying a pfSense VM for Our VirtualBox-Based Cyber Lab" section. Screenshots won’t be included here, since they’re already provided in that section.
Select Option 1) Assign interfaces from the pfSense console menu.
- Should VLANs be set up now [y|n]? :
n - Enter the WAN interface name or ‘a’ for auto-detection:
vtnet0 - Enter the LAN interface name or ‘a’ for auto-detection:
vtnet1 - Enter the Optional 1 interface name or ‘a’ for auto-detection:
vtnet2 - Enter the Optional 2 interface name or ‘a’ for auto-detection:
vtnet3 - Enter the Optional 3 interface name or ‘a’ for auto-detection:
vtnet4 - do you want to proceed ?
y
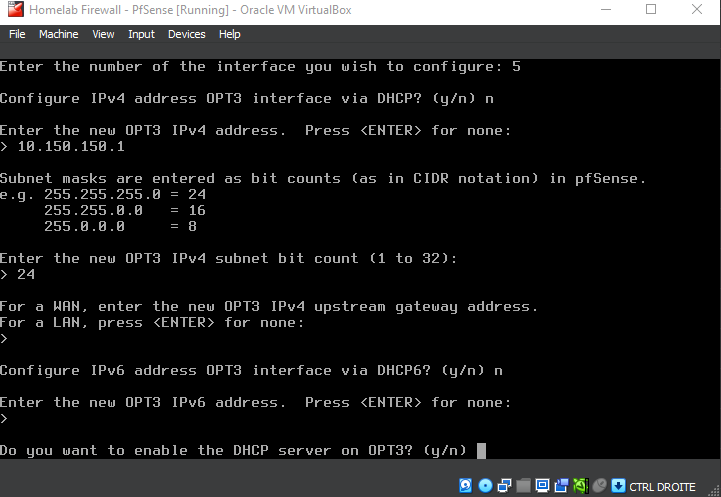
Configure the NEW_SUBNET interface (OPT3)
Here, we configure the OPT3 (NEW_SUBNET) interface by assigning static IPv4 address and enabling the DHCP server:
- Choose the interface number corresponding to the OPT1 (in this case,
5). - When prompted, decline DHCP for the LAN interface by typing
n. - Enter the desired static IP address (
10.150.150.1) and subnet mask bit count (24for a/24subnet). - Leave the upstream gateway blank by pressing
ENTER. - Disable IPv6 configuration by typing
n. - Enable the DHCP server on OPT3 by typing
y, then specify the DHCP range (start:10.150.150.11, end:10.150.150.100). - Answer
nto reverting to HTTP as the webConfiguraor protocol.
Notice the new adapter OPT3 that shows up in PfSense
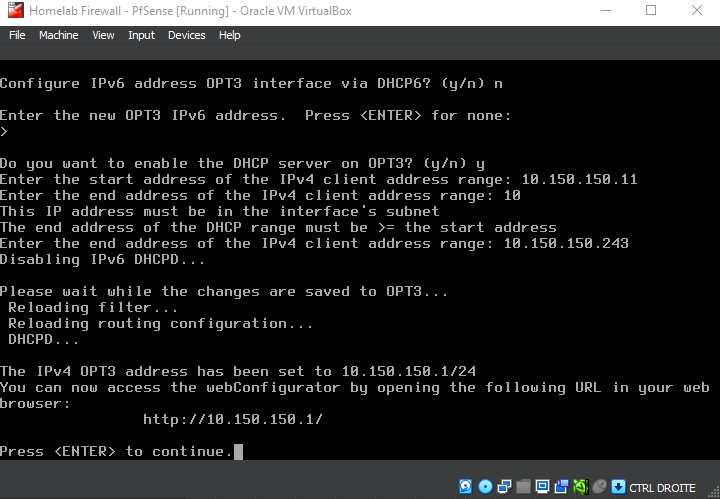
Notice the new adapter OPT3 that shows up in PfSense
Delete an Interface
# Notice that my commands specify the number 5 in the options
    # --nicX, --nictypeX, --intnetX, --cableconnectedX
.\VBoxManage.exe modifyvm "pfSense-CyberRange" --nic5 none
.\VBoxManage.exe modifyvm "pfSense-CyberRange" --intnet5 none
Shutdown the pfSense VM and run these commands to add the NEW_SUBNET interface :
.\VBoxManage.exe showvminfo "Homelab Firewall - PfSense"
Adding SPAN interface for suricata
details For the interface are as follows:
- VM Name:
Homelab Firewall - PfSense(case sensitive) - New Interface ID:
5(new interface number) - Attachment Type
Internal Network - Internal Network Name:
Homelab - SPAN - Promiscuous Mode:
Allow All(We need it to monitor the network) - Cable Connected
Yes(is set to On by default)
# Configure NIC5 for Internal Network with promiscuous mode and virtio
.\VBoxManage.exe modifyvm "Homelab Firewall - PfSense" --nic5 intnet
.\VBoxManage.exe modifyvm "Homelab Firewall - PfSense" --intnet5 "Homelab - NEW_SUBNET"
.\VBoxManage.exe modifyvm "Homelab Firewall - PfSense" --nictype5 virtio
.\VBoxManage.exe modifyvm "Homelab Firewall - PfSense" --nicpromisc5 allow-all
# If you want a specific MAC adress, otherwise it will be generated automatically
.\VBoxManage.exe modifyvm "Homelab Firewall - PfSense" --macaddress5 080027DEADBEEF
# Optional, gets set to "on" by default
.\VBoxManage.exe modifyvm "Homelab Firewall - PfSense" --cableconnected5 on
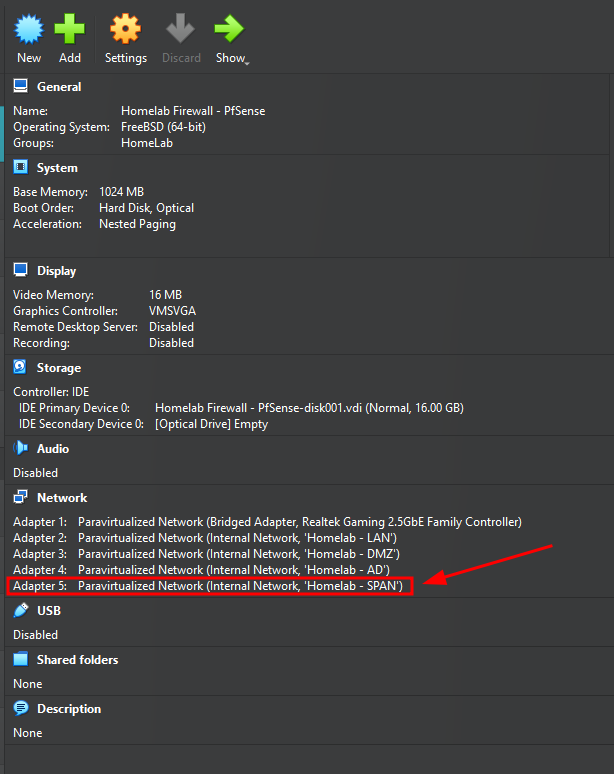
Notice the new adapter Adapter 5 that shows up in virtualbox